
Blue Ox Trailer Hitch Receiver - Custom Fit - Class III - 2"


 Arrives before Christmas
 To see if this custom-fit item will work for you please tell us what vehicle you'll use it with.
Product Images

Show All (1) Product Images
Show Fewer Product Images
In Use/Installed


Show All (9) In Use/Installed
Show Fewer In Use/Installed
Videos
Show All (1) Videos
Show Fewer Videos
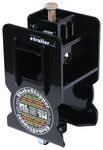
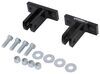
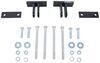
This fully welded trailer hitch receiver bolts onto your vehicle's frame with no welding required. Textured black powder coat over e-coat shields against rust and corrosion. Mounting bracket for wiring is welded on for a clean look.
Features:
Specs:
At etrailer.com we're committed to the products we sell, and to our customers. Our experienced and knowledgeable staff are available via both phone and email to address your questions and concerns for the lifetime of your hitch. The technicians at etrailer perform hitch installations on a daily basis, making them a valuable resource for do-it-yourselfers. The one-on-one, personal service you'll receive comes straight from an expert in the towing and automotive field. We've installed it, we've wired it and we've towed with it, so whatever your question, we can answer it.

California residents: click here
ATTENTION STATE OF CALIFORNIA CONSUMERS
WARNING: Cancer and reproductive harm - www.p65warnings.ca.gov
Videos are provided as a guide only. Refer to manufacturer installation instructions and specs for complete information.
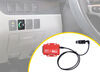
Hi, I'm Danny with etrailer, and today, we're gonna be taking a look at our Blue Ox Hitch on our 2016 Chevy Traverse. Adding a hitch onto your Traverse is a great option if you're wanting to maximize space, maybe do some light-duty towing, or having a bike rack back here. So this actually, the hitch, has one of the highest tongue weights out of the options we have here. So if you have a bunch of e-bikes, this is gonna be a great option for you. So what's really nice about the Traverse is it comes with this panel, so you can actually completely hide this hitch if you put this back on your vehicle. And now, it's completely back to OEM.
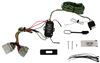
So another thing about this hitch in particular is if you do decide to do some light-duty towing with this vehicle, it comes with this bracket that allows you to put your 7-pole or your 4-pole wiring harness into there, which is nice. So this hitch has a two inch by two inch hitch receiver, which will accommodate most of your accessories. It also has a 5/8 inch pin hole here for your pin and clip. Now, it doesn't come included with a pin and clip, but you can purchase one here at etrailer, or it comes in most of your accessories. I would recommend getting a locking pin and clip, just so you have that peace of mind when you're out and about with your accessory attached in there.
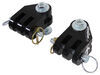
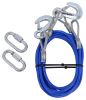
Now, let's look at the safety holes here. It does accommodate an S-hook, as well as a clevis style. (hook clanking) Now, I'll go ahead and get you a couple measurements you may need to know. So from the ground to the top of our hitch receiver here is about 18 3/4. And that's important to know if you have an accessory back here and you're gonna go up a steep incline, you just wanna make sure that ground doesn't come into contact with your accessory.
Now, our next measurement here is from the center of our pinhole to the outside of our bumper, and that is about six inches. So that's important to know if you have a folding accessory and you don't want that to come in contact with your bumper. So our max towing capacity with this hitch is gonna be 5,000 pounds, and that is the trailer plus what's ever inside of it. And the tongue weight is gonna be 750 pounds, and that is the max weight that can be pushing down on the hitch in this direction. Now, if you use a weight distribution system with this hitch, it's going to pump those numbers up to a max towing weight of 7,500 pounds and a max tongue weight of 1,125 pounds.
Now, be sure to check your Traverse's owner manual and see what your car is capable of towing, and make sure to go with a lesser of those two numbers. Now, getting to the install of this hitch. It is fairly simple, it's pretty much just a bolt-on hitch. You could probably do it in an afternoon. But if you don't have the tools or the time, or if you wanna add a trailer wiring to this, feel free to check out our dealer locator, and we can get a professional to do it for you. Also, if you do decide to get a hitch, please let us know what you're using it for in a comment or review. But without further ado, follow along, and I'll show you how to put this hitch on. All right, and first off, we're gonna go ahead and take this cover on this fascia off. You can just turn these fasteners horizontal to the bumper, and it should release. There we go. This side. And I'm gonna put that to the side. All right, now, I'm gonna go ahead and drop this exhaust down. But first, I'm gonna put this strap on, just so I can control the descent of it and all the weight's not pushing down. Tighten that up. Now, I'll go ahead and take these rubber isolators off. So there's three rubber isolators you wanna remove. So there's one on the right side of exhaust here, one on the left here, and then one on the back. I'm gonna go and get this one off. It helps if you spray some lubricant in there, maybe soapy water even, just to get these off. (can clinking) (lubricant spritzing) (exhaust clanking) All right. (lubricant spritzing) (exhaust clanking) And once you get this last isolator off, you can lower that down, just so you can get to these holes here. This last one was a little bit tricky to get to, but if you just spend some time, you can get it off. And now, I'm gonna go ahead and wire brush these weld nuts here, just to make sure there's no burrs that's gonna stop us from putting in our hardware. So now, with all four of these cleaned out on both sides, I'm gonna go ahead and run our hardware in. And I'm gonna make sure it's going in nice and hand tight. And I'm just gonna run it down just to make sure we don't have any problems when we put on our hitch. (impact driver buzzing) And you have these tooth washers that come in the kit, and you're gonna wanna put those with the teeth facing the vehicle, so it bites into that metal when you tighten it down. And now that we've done all that, we can go ahead and lift our hitch into place. (nut clanking) And once you get all four of these hand tight on both sides, you can just come back with a 3/4 inch socket and tighten the rest of the way. (impact driver buzzing) All right, now, I'm gonna go ahead and torque them all down to the specs in the instructions. If you don't a torque wrench at home, you can buy one here at etrailer, or you can usually rent one from your local auto parts store. (torque wrench beeping) All right, now, we're gonna take this fish wire and go up into where our bolt's gonna go. And we aren't gonna use this opening here, we're gonna go all the way to the end of that frame tube. And here it comes out on this end. We're gonna put our bracket on, and then our bolt. I'm gonna put that up in there, and pull our fish wire. And then I'm gonna go ahead and put the nut on. And if you need to hold it down, you can use your finger. All right, now, I'm gonna go ahead and do the other side. Now, with both of those hand tight, I'm gonna get on the rest of the way with a 3/4. (impact driver buzzing) And now, I'm gonna go ahead and torque these down as well. (torque wrench ratcheting) (torque wrench beeping) And once you put that exhaust back up into place, your hitch is installed and you're good to go. And that was a look on our Blue Ox Hitch on our Chevy Traverse. I'm Danny with etrailer, thanks for watching.
Info for this part was:
At etrailer.com we provide the best information available about the products we sell. We take the quality of our information seriously so that you can get the right part the first time. Let us know if anything is missing or if you have any questions.


Thank you! Your comment has been submitted successfully. You should be able to view your question/comment here within a few days.
Error submitting comment. Please try again momentarily.